本教程为原教程的翻新,旧教程使用的nfs版本较旧,指令已不适用新的环境
前言
今天在给文件库搭建NFS的时候发现某台机子出现了各种代码故障,然后经过排查后发现,正常的机子使用的是旧的yum库,nfs版本为0.12,而出问题的机子使用的是最新的nfs版本,也就是2.3.3版本,部分指令有些出入,故新开一篇文章专门再写一次。
本次用到的服务器
一台NFS服务器
一台使用NFS进行存储的服务器
每台服务器环境
Centos 7/8
宝塔7.x
开始
[infobox title=”centos7安装EPEL源”]
wget http://dl.fedoraproject.org/pub/epel/epel-release-latest-7.noarch.rpm
rpm -ivh epel-release-latest-7.noarch.rpm
[/infobox]
将centos7的源更新至最新,以下载2.3.3版本的nfs
[infobox title=”centos7安装NFS”]yum -y install nfs-utils rpcbind[/infobox]
centos8则使用dnf软件管理器安装
[infobox title=”centos8安装NFS”]yum -y install nfs-utils rpcbind[/infobox]
[infobox title=”设置开机自动启动服务”]
systemctl enable nfs-server.service
systemctl enable rpcbind.service
[/infobox]
[infobox title=”启动服务”]
systemctl start nfs-server
systemctl start rpcbind
[/infobox]
接下来是开放端口,如果你是内网环境进行测试,可以直接关闭centos的防火墙。
但由于我这边搭建是时属于公网环境,并且公网环境更贴近实际情况,所以本处介绍的是固定其端口并让防火墙放行。
注;我的文本编辑器是vim,如果没有vim可以安装下,当然,习惯用nano的话,把vim改成nano就好
[infobox title=”vim编辑器安装”]
yum install -y vim
[/infobox]
[infobox title=”vim编辑器常用指令”]
非指令模式下:
按a进入编辑模式
输入”:”进入指令模式
指令模式下:
q 退出
q! 强制退出
w 保存
wq 保存并退出
esc 返回非指令模式
编辑模式下:
esc返回非指令模式
[/infobox]
以上为你可能需要用到的vim操作方式
固定端口
[infobox title=”nfs配置文件”]
vim /etc/sysconfig/nfs
[/infobox]
进入后将下面指定的端口粘贴进去
[infobox title=”固定端口”]
RQUOTAD_PORT=23331
LOCKD_TCPPORT=23332
LOCKD_UDPPORT=23333
MOUNTD_PORT=23333
STATD_PORT=23334
[/infobox]
[infobox title=”修改内核参数,指定端口”]
vim /etc/sysctl.conf
[/infobox]
[infobox title=”固定端口”]
fs.nfs.nlm_tcpport=23332
fs.nfs.nlm_udpport=23332[/infobox]
[infobox title=”重启服务”]
systemctl restart rpcbind
systemctl restart nfs-server
[/infobox]
如果出现:
Invalid unit name "xxx " was escaped as "xxx\xc2\xa0" (maybe you should use systemd-escape?)
Failed to restart xxx\xc2\xa0.service: Unit xxx\xc2\xa0.service not found.
则运行
systemd-escape xxx
另外,/etc/modprobe.d/lockd.conf下也需要配置端口以锁定(不然你的端口号会反复横跳)
[infobox title=”端口配置文件”]
vim /etc/modprobe.d/lockd.conf
[/infobox]
粘贴以下配置
[infobox title=”锁定端口”]
options lockd nlm_tcpport=23332
options lockd nlm_udpport=23332
[/infobox]
完毕后退出重载
[infobox title=”重启服务”]
systemctl restart nfs-config
systemctl restart nfs-idmap
systemctl restart nfs-lock
systemctl restart nfs-server
这样端口就配置完毕了,前往宝塔控制面板把23331-23334给放行就好,可以在宝塔那边直接写23331:23334 快捷添加全部端口
另外还要放行下111端口和2049端口
分享目录
目前NFS的通信已经是正常的了,接下来就是新建文件夹,将NFS指定分享。
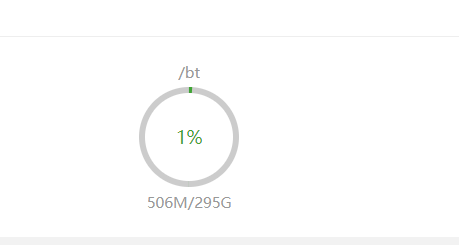
新建一个文件夹,本处叫bt,也就是/bt

然后开始配置NFS分享
[infobox title=”配置授权文件”]
vim /etc/exports
[/infobox]
[infobox title=”分享目录并给予授权”]/bt 需要使用NFS进行存储的服务器(rw,sync,no_root_squash)
[/infobox]
保存,然后切换到需要进行存储的那台服务器
[infobox title=”挂载硬盘”]
mount NFS服务器IP地址:/bt /bt
[/infobox]
开机自动挂载
[infobox title=”配置文件”]
vim /etc/fstab
[/infobox]
[infobox title=”永久挂载”]
NFS服务器IP地址:/bt /bt nfs rw,tcp,intr 0 1
[/infobox]
保存,退出,重启即可看到效果。
挂载效果
